
Initial Setup
(Video)
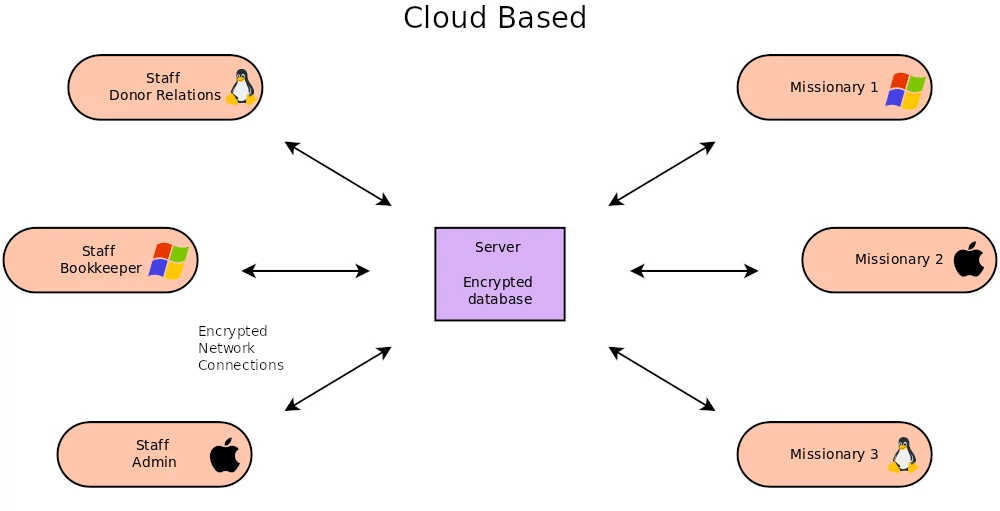
In order to use Mission Donor Manager, a server must be setup first. Please direct technical staff or a IT consultant to review the server setup instructions before continuing in this guide.
Technical staff or a IT consultant will provide the host ID and port number of the server to connect to. This information must be provided to each user the first time they run Mission Donor Manager. MDM will remember this information once entered the first time.
The very first user to connect to a new server setup has the responsibility to set the database password. Enter the database password and click start. MDM will then prompt for a user name and password. Just leave these blank and click login. MDM will open to the Users tab. You must create the admin account. Click the “New” Button. You must enter a first and last name and an email address. Then click save. Now click on the “Permissions” sub tab. Click the “Edit” button and enable permissions for your admin role. As a minimum, “User Modify” must be enabled for you to add more users. Click save.
Switch to the Setup tab directly below the users tab. Click “Edit” button, then enter the “Outgoing Email Server” and the “Outgoing Email Server Port” and then click save. Switch back to the Users tab. You should still be on the Permissions sub tab. Click “Reset Password” button and then confirm by clicking “Reset” and check your email for the temporary password. If you do not get an email, double check your email address in the Users Info sub tab and also the Outgoing email server settings. If you do get the email close MDM. Then re-open MDM and login with your temporary password. If you successfully login, close MDM again, then re-open MDM and change your password on the login screen. Then click “Change” button to set the new password and login. Then close MDM again and re-open and login with your new password.
Add Organization Info
(Video)
Organization information that appears on tax receipts is entered on the Setup tab under the General sub tab. Click the Edit button and then enter Business name, CRA charitable business number, address, phone number, issue location and fiscal year end. Then click save. Click the Edit button again and then click the Upload Banner button. Choose a banner image file and then click open. The banner image must be less than 1100 pixels in width and less than 350 pixels in height and should have a transparent background. Now is also a good time to enter the donor relations email and enter the standard rate if your organization takes an operations / admin fee from donations.
Add Users (Add Staff and Missionaries)
(Video)
Next add staff and missionary user accounts on the Users tab. Each user will need a minimum of a first and last name and an email address. Click “New” button, enter the info, then click “Save” button. Switch to the Permissions and click the “Edit” button. Enable the appropriate permissions for each user and click the “Save” button. Note, missionaries will only have “Mission Financial View” enabled. Then click “Reset Password” button and then confirm by clicking “Reset”. This will email the user their temporary password. It is a good idea to follow up with the new user to make sure they received their temporary login password and are able to login. Repeat for each new user.
Setup with QuickBooks
(Video)
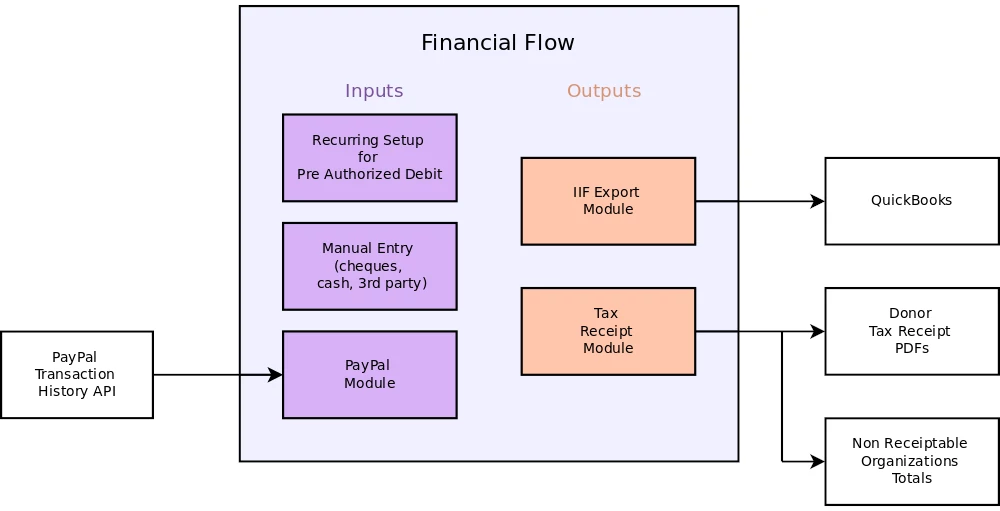
Donation funds are moved from an income account to a specific mission account. At least one income account must be added. When the transactions are exported to QuickBooks, the iif file contains which income account was debited and which mission account was credited. Mission accounts are entered in the mission setup tab for each mission. An operations account number can be entered under the Setup tab, General sub tab. An operations account holds the operation fees deduced from donations. All income accounts, mission accounts and the operations account must simultaneously exist in Mission Donor Manager and QuickBooks for the iif export to work.
To create an income account, go to the Setup tab and then the Income Accounts sub tab. Click the new button. Enter the account name and QuickBooks account number, then click Save. The added income account can now be selected on the Manual donation entry tab or the recurring list edit. To set the operations account number, go to the Setup tab, General sub tab. Click the Edit button and enter the QuickBook’s operations account number. Then click Save.
Add Missions
(Video)
Missionaries will need one or more missions added to their user account. If your organization does not have missionaries, you must still create at least one mission to accept donations. (The name of your organization will suffice, or general, or common, etc)
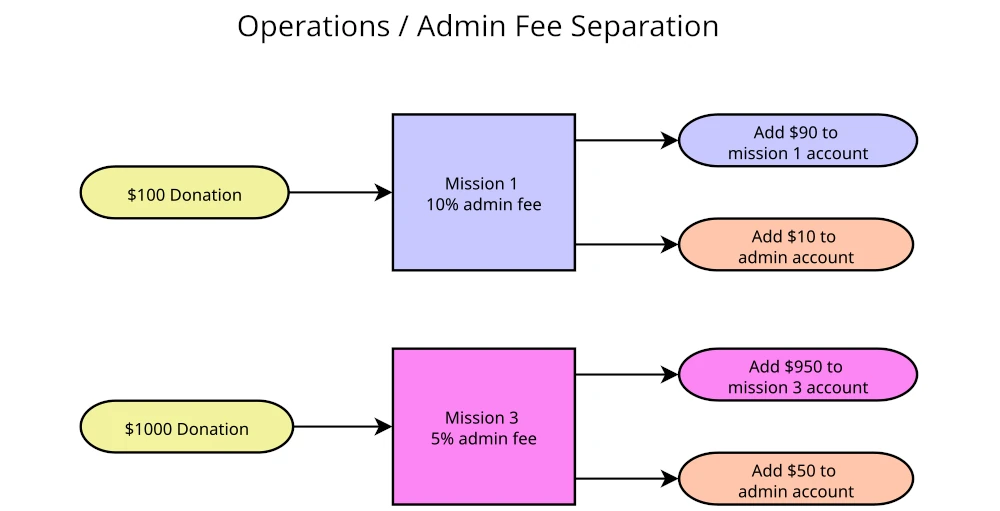
On the Missions tab click the new button. Enter the mission name. Select Standard Rate or Custom Rate. Standard Rate uses the percentage entered under the Setup Tab. If you choose Standard Rate, and for example the standard rate is 10%, donations to this mission will have 10% taken from the donation an put into the operations account. If you choose Custom Rate and set it at 20%, donations to this mission will have 20% taken from the donation an put into the operations account. If you do not have missionaries, set the operations rate to 0% so the full amount goes into this account.
If you are accepting Paypal donations on your website you can enter the Paypal donation button id. Learn more about Paypal integration here. If this mission is external to your organization and you are accepting donations on their behave, set the proxies settings, otherwise leave the proxy setting in their default state. To learn more about accepting donations on behave of other organizations and how to setup the proxy settings, click here. If this mission is not a proxy, enter the QuickBooks account number. Click the Save button
If your organization has missionaries, switch to the Users tab. Select the missionary you want to associate the newly added mission with. Click on the Missions sub tab. Click the Edit button and select the newly added mission. Press the Add button. The Mission should now appear under the Enabled Missions list. Click Save. Repeat for additional missionaries you want associated with the newly added mission.
Add Signatory for Tax Receipts
(Video)
A signatory must be added before tax receipts can be generated. Click the Tax tab and then the Signatory sub tab. Click the New button and then enter the signatory’s name and then click Save. The name entered will appear on tax receipts exactly as entered. Next click the Change Signatory button and select the newly added signatory from the drop down. Now click the Choose File button to select the signatory’s signature image file. The signature image should be 150px in height and up to 700px in width. Multiple signatory’s can exist along with their signature file. This facilitates treasurer rotation without having to re-add their signature after their sabbatical. You can now preview an example tax receipt by clicking the Preview Example Receipt button which will download as a pdf.
Setup Thank-you Responses
(Video)
Thank you templates must be created if thank you letters are used. Click the Thankyou tab and then the Common sub tab. There are two templates, one for email responses and one for printed snail mail responses to be placed in a #10 envelope. The templates have variables that get substituted for specific information when the thank you response is created. For example [[date]] will get substituted for the current date, January 4, 2024. Variables are enclosed by double square brackets [[ ]].
List of Variables
- [[address-salutation]] Address Salutation is used by the printed mail and tax receipt generator for the formal salutation above the mailing address appearing in the envelope window (Mr. And Mrs. Doe). It can also be used in the templates if desired. If Address Salutation is non blank in the donor’s profile, [[address-salutation]] will get substituted with what is entered in the donor’s profile. If Address Salutation is blank, [[address-salutation]] will get substituted with the donor’s first and last name.
- [[salutation]] If Salutation is non blank in the donor’s profile, [[salutation]] will get substituted with what is entered in the donor’s profile. If Salutation is blank, [[salutation]] will get substituted with the donor’s first and last name.
- [[amount]] will get substituted with the amount of the donation, ex. $350.00
- [[date]] will get substituted for the current date, ex. January 4, 2024.
- [[mission]] will get substituted with the mission name that the donation was made for.
Example template
Dear [[salutation]],
This is a confirmation for your recent donation of [[amount]] on [[date]] for [[mission]].
Thank you email generated from example template
Dear Jane Doe,
This is a confirmation for your recent donation of $100.00 on January 4, 2024 for Lima Outreach.
Printed thank you letters for snail mail have line formatting control words, font, bold and slip, in addition to the variables. font and bold are used at the start of a line to change the font size or bold size. [[bold12]] will make the whole line bold at a font size of 12. [[font9]] with make the whole line a font size of 9. [[slip]] can be used at the end to add a pre-built remittance slip. To change the templates click the Edit button, type out or copy and paste in the template text and then click Save. Printed thank you letters also include a header that has your organizations name, address and banner. Once you have at least one printed thank you letter waiting to be sent, you can download it and check it is satisfactory. If you make changes to the template, you can re-download the thank you letter and it will have the new changes made to the template. You can keep checking this way until you click the Clear Waiting button.
Each Mission can also have a unique thank you response. Click the Missions sub tab, and select the mission. Click the Edit button and select the “Use Custom Thank you” in the bottom left. Then type out or copy and paste in the custom template. You can start a custom template from the common template by clicking the Copy Common button. When the custom template is complete, click Save.
Add Donors
(Video)
Add new donors on the Donors tab by clicking the New button. Enter the donor’s first and last name and additional information that you have for the donor. If you are accepting donations using PayPal, the donor’s PayPal account does not have to be entered as long as their entered email address is the same email address on their PayPal account. Set the donor’s type. If the donor is a 3rd party that accepts donations on your behalf, set the donor type to Canadian Charity and check the checkbox “Is a 3rd Party”. Then click Save. Next click the Mail sub tab and then click the Edit button. Set the donor’s communication preferences and then click Save.
Setup Recurring Donations
(Video)
To create or apply a recurring list of donations switch to the Recurring tab. Start by entering the name of the new list in the box titled “Enter New List Name Here”. Then click the Create New List button. More than one recurring list of donations can be made. This can be useful for separating recurring monthly credit card donations and recurring monthly pre authorized debit donations into separate lists. It can also be useful if you have multiple groups of recurring donations that happen on different days of the month.
Select the new list and then click the Add / Edit Donations button. To add a new donation click the New button. Proceed to select the donor, the mission, the income account and then enter the amount. Then click the save button. You can change the amount or income account in the future by clicking on the donation, then make the changes and then click save. You can also disable a donation from being applied by clicking on the donation, unchecking the Enabled checkbox and then clicking Save.
When you are done adding the recurring donations, click the Done button. A list of donations can be applied by selecting the a list of donations, selecting the date and then clicking the Run button.
PayPal
See the PayPal Setup Guide.