
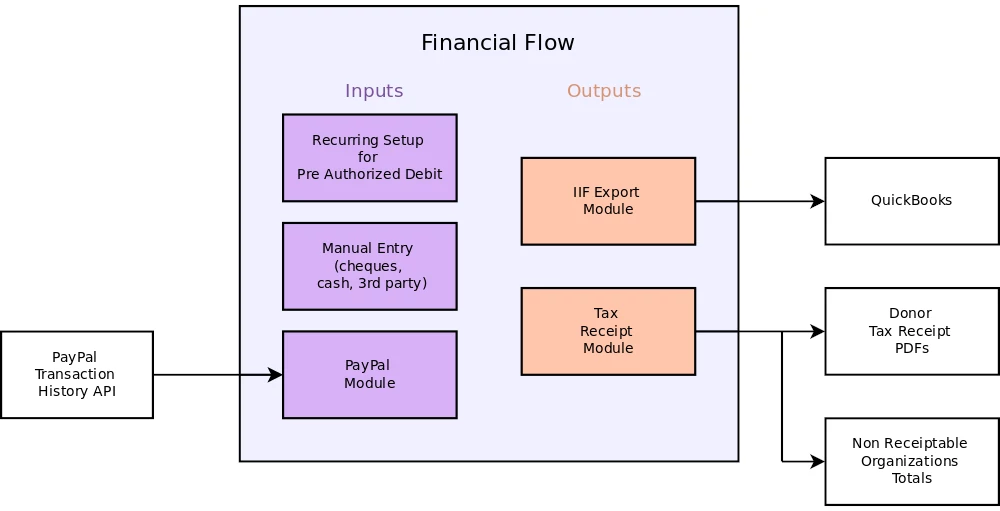
Mission Donor Manager uses a PayPal REST API app to gain access to your organization’s transaction history looking for donation transactions (T0013) and recurring transactions (T0002). There are two ways to use PayPal donation buttons. Method A – Create a link does not allow for recurring donations, while Method B – SOAP form does allow for recurring donations. Interaction with your organization’s webmaster is necessary for either method.
Method A – Create a link
Donations buttons should be created in PayPal first, then the REST API app should be created in PayPal and finally the donation buttons added to your website. A donation button must be created for each mission that you want to accept donations for on your website.
- Log into your Paypal account.
- Click on “Pay & Get Paid” on the main menu, then under “Accept Payments” click Donations.
- Of the three options, select “Create a link”. Enter the mission name in the project name field and fill out the other fields. Click Continue.
- When you come across “Let donors make monthly recurring donations?” disable this setting.
- When you come across “Get donors’ mailing addresses” enable this setting.
- When you come across “Let donors send you an optional note with their donation” disable this setting.
- When you come across “Add extra HTML button variables” enable this setting.
- Click Finish.
- You should be back at the main donation page. Look for your new page (button) in the list at the bottom, then click on it. You should enter into the new page you just created.
- note the ID near the top. Copy the characters after the ID:
(QS7YJUKLG5G4L is right ID: QS7YJUKLG5G4L is wrong) - Click Edit.
- Keep pressing continue until you get to the “Add extra HTML button variables”.
- Click in the HTML variables text box and type custom= and then paste your button id. It should look like this
custom=QS7YJUKLG5G4L
where QS7YJUKLG5G4L is replaced with your button id. - Open Mission Donor Manager and switch to the Mission Setup tab.
- Select the mission you just created the button for and then click Edit.
- paste in the button id into the “PayPal Button ID” text box.
- Click Save.
- repeat for each additional button
After the REST API app is setup (below), get the link url from each button and add it to your website. The link url is under “Pay & Get Paid” --> “Accept Payments” --> Donations, select one of the buttons. Under “Share your donation page” click Get Link, copy the link and then provide it to your webmaster for integration into your web page. Repeat for the additional buttons.
Method B – SOAP form
The following is an example of a SOAP form that can be used in your webpage to submit donations to PayPal.
- The value for the variable business must be set to your organizations PayPal Merchant ID.
- If used, the value for the variable return must be set to the webpage you want the donor to return to after completing the donation on PayPal.
- The amount variable is optional if you want the donor to enter the amount on your website along with the mission before proceeding to PayPal.
- The values for the variables item_name and item_number must be dynamically set for which mission the donation is for. A unique ID must be used to identify each mission a donation can be made to. item_number is set to this unique ID and item_name must contain the unique ID somewhere and be enclosed by square brackets as shown in the example. The unique ID for each mission must be entered into Mission Donor Manager for each mission.
- Open Mission Donor Manager and switch to the Mission Setup tab.
- Selebusct the mission and then click Edit.
- Enter the unique ID into the “PayPal Button ID” text box.
- Click Save.
- Repeat for each additional button
The following is an example of a SOAP form that can be used in your webpage to create recurring donations.
List of PayPal html variables
Create REST API app
- Log into your PayPal account.
- Click the “Developer” link in the upper right corner beside your name.
- Check to make sure you are in Live mode and not Sandbox mode.
- Click the button called “Apps & Credentials”
- Click the button called “Create App”
- Enter the name of the app. This can be anything, example MDM. Click Create App.
- Scroll to the bottom of the page where it says Features. Uncheck / disable everything that you can.
- Check / enable Transaction search
- Click Save Changes.
- Scroll back to the top
- Copy the Client ID, then enter Mission Donor Manager, go to the Setup tab, General sub tab.
- Click Edit.
- Paste the Client ID in “PayPal App Client ID”
- Switch back to your web browser (back to your PayPal account) and copy the Secret key 1
- Switch back to Mission Donor Manager and paste the secret key 1 in “PayPal App Secret Key”
- Select an income account for PayPal to use from the drop down “PayPal Income Account”
- If not set already, set the Donor Relations Email
- Click save
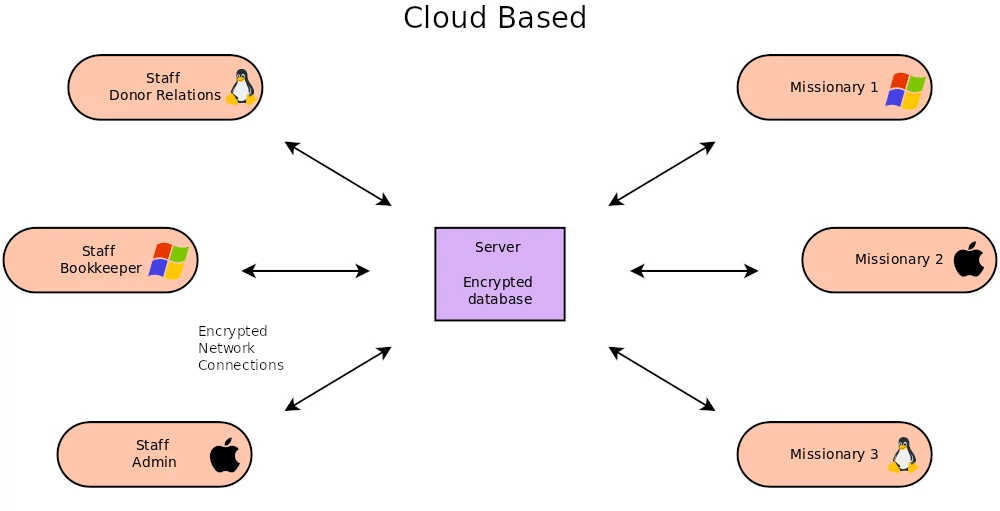
Mission Donor Manager will begin checking for transactions every 15min. Note there is a 4-5 hour delay from when a donation is made with PayPal until PayPal posts the transaction in the history. Mission Donor Manager only becomes aware of the donation transaction after this delay and it can not send a thank you response until then. Mission Donor Manager asks PayPal for a list of transactions over a last 7 days. If the server running Mission Donor Manager is down for a few days, no transaction will get missed. When the server is restarted, Mission Donor manager will process the donations during the time the server was down, up to 7 days.
When a donation is made from a new business or charity, Mission Donor Manager will send an automated message to the Donor Relations email address asking to set the type of the new donor. PayPal does not include information to distinguish a business (gets a tax receipt) from a charity (does not get a tax receipt).